
代码统一规范
ESLint约束
检测JS/TS代码
1.安装
- 下载ESLint插件
- 安装依赖
`npm i -D eslint安装eslint作为开发时的依赖`
2.配置
- 配置初始化
`npx eslint --init `

npx是一个 npm 包执行器,通过 `npx`,你可以直接运行安装在项目中的 npm 包,而不需要全局安装这些包。它的作用类似于全局安装包后使用命令行执行该包的命令,但是不需要事先全局安装。
根目录自动生成的
.eslintrc.cjs配置内容如下:module.exports = { env: { es2021: true, node: true, }, extends: [ "eslint:recommended", "plugin:vue/vue3-essential", "plugin:@typescript-eslint/recommended", ], overrides: [], parser: "vue-eslint-parser", //在默认配置基础上需要修改解析器为 vue-eslint-parser ,不然在检测执行中出现 error Parsing error: '>' expected 的解析错误 parserOptions: { ecmaVersion: "latest", sourceType: "module", parser:"@typescript-eslint/parser" }, plugins: ["vue", "@typescript-eslint"], rules: { "vue/multi-word-component-names": "off", // 禁用vue文件强制多个单词命名 "@typescript-eslint/no-explicit-any": ["off"], //允许使用any "@typescript-eslint/no-this-alias": [ "error", { allowedNames: ["that"], // this可用的局部变量名称 }, ], "@typescript-eslint/ban-ts-comment": "off", //允许使用@ts-ignore "@typescript-eslint/no-non-null-assertion": "off", //允许使用非空断言 "no-console": [ //提交时不允许有console.log "warn", { allow: ["warn", "error"], }, ], "no-debugger": "warn", //提交时不允许有debugger }, };
新建并配置忽略eslint文件.eslintignore
dist
node_modules
public
.husky
.vscode
.idea
*.sh
*.md

src/assets

.eslintrc.cjs
.prettierrc.cjs
.stylelintrc.cjs
添加eslint检测指令
在package文件里面scripts里配置eslint检测指令
"lint:eslint": "eslint \"src/**/*.{vue,ts,js}\" --fix"
运行时直接执行npm run lint
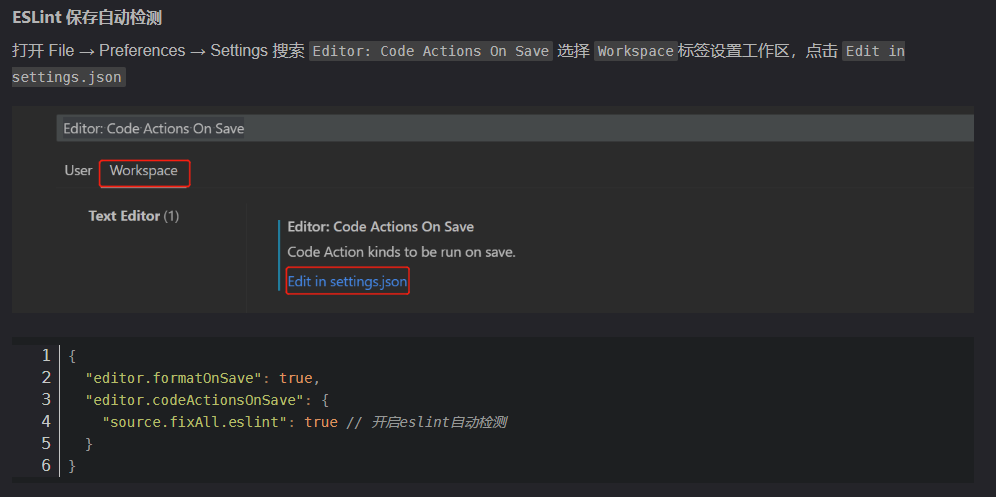
eslint保存自动检测
Editor: Code Actions On Save
prettier代码格式化工具
- 安装插件Prettier - Code formatter
- 安装依赖
npm i -D prettier
新建并配置.prettierrc.cjs文件
//官方配置
module.exports = {
  // (x)=>{},单个参数箭头函数是否显示小括号。(always:始终显示;avoid:省略括号。默认:always)
  arrowParens: "always",
  // 开始标签的右尖括号是否跟随在最后一行属性末尾,默认false
  bracketSameLine: false,
  // 对象字面量的括号之间打印空格 (true - Example: { foo: bar } ; false - Example: {foo:bar})
  bracketSpacing: true,
  // 是否格式化一些文件中被嵌入的代码片段的风格(auto|off;默认auto)
  embeddedLanguageFormatting: "auto",
  // 指定 HTML 文件的空格敏感度 (css|strict|ignore;默认css)
  htmlWhitespaceSensitivity: "css",
  // 当文件已经被 Prettier 格式化之后,是否会在文件顶部插入一个特殊的 @format 标记,默认false
  insertPragma: false,
  // 在 JSX 中使用单引号替代双引号,默认false
  jsxSingleQuote: false,
  // 每行最多字符数量,超出换行(默认80)
  printWidth: 120,
  // 超出打印宽度 (always | never | preserve )
  proseWrap: "preserve",
  // 对象属性是否使用引号(as-needed | consistent | preserve;默认as-needed:对象的属性需要加引号才添加;)
  quoteProps: "as-needed",
  // 是否只格式化在文件顶部包含特定注释(@prettier| @format)的文件,默认false
  requirePragma: false,
  // 结尾添加分号
  semi: true,
  // 使用单引号 (true:单引号;false:双引号)
  singleQuote: false,
  // 缩进空格数,默认2个空格
  tabWidth: 2,
  // 元素末尾是否加逗号,默认es5: ES5中的 objects, arrays 等会添加逗号,TypeScript 中的 type 后不加逗号
  trailingComma: "es5",
  // 指定缩进方式,空格或tab,默认false,即使用空格
  useTabs: false,
  // vue 文件中是否缩进 <style> 和 <script> 标签,默认 false
  vueIndentScriptAndStyle: false,
};
新建并配置.prettierignore忽略文件
dist
node_modules
public
.husky
.vscode
.idea
*.sh
*.md

src/assets
配置启动命令
"lint:prettier": "prettier --write \"**/*.{js,ts,json,css,less,scss,vue,html,md}\""
配置prettier自动保存
{
  "editor.formatOnSave": true, // 保存格式化文件
  "editor.defaultFormatter": "esbenp.prettier-vscode" // 指定 prettier 为所有文件默认格式化器
}
stylelint css
CSS代码检测规范
- 安装插件Stylelint
- 安装依赖
npm install -D stylelint stylelint-config-standard stylelint-config-recommended-scss stylelint-config-recommended-vue postcss postcss-html postcss-scss stylelint-config-recess-order stylelint-config-html- 新建并配置.stylelintrc.cjs文件
module.exports = {
  // 继承推荐规范配置
  extends: [
    "stylelint-config-standard",
    "stylelint-config-recommended-scss",
    "stylelint-config-recommended-vue/scss",
    "stylelint-config-html/vue",
    "stylelint-config-recess-order",
  ],
  // 指定不同文件对应的解析器
  overrides: [
    {
      files: ["**/*.{vue,html}"],
      customSyntax: "postcss-html",
    },
    {
      files: ["**/*.{css,scss}"],
      customSyntax: "postcss-scss",
    },
  ],
  // 自定义规则
  rules: {
    // 允许 global 、export 、v-deep等伪类
    "selector-pseudo-class-no-unknown": [
      true,
      {
        ignorePseudoClasses: ["global", "export", "v-deep", "deep"],
      },
    ],
  },
};
配置检测时的命令(可以检测css中的错误)
"lint:stylelint": "stylelint \"**/*.{css,scss,vue,html}\" --fix"
设置保存自动检测(自动修改css代码为符合书写规范的顺序)
{
  "editor.codeActionsOnSave": {
    "source.fixAll.stylelint": true // 开启 Stylelint 保存自动检测
  },
  // Stylelint 校验文件
  "stylelint.validate": ["css", "scss", "vue", "html"]
}
git提交规范
Husky
安装并配置
npx husky-init && npm install
安装后会自动生成.husky文件夹
核心内容是配置 Husky 的 pre-commit 和 commit-msg 两个钩子:
pre-commit:Husky + Lint-staged 整合实现 Git 提交前代码规范检测/格式化 (前提:ESlint + Prettier + Stylelint 代码统一规范);
commit-msg: Husky + Commitlint + Commitizen + cz-git 整合实现生成规范化且高度自定义的 Git commit message。
lint-staged
是一个在 git add 到暂存区的文件运行 linters (ESLint/Prettier/StyleLint) 的工具,避免在 git commit 提交时在整个项目执行。
npm install -D lint-staged
package.json 中添加不同文件在 git 提交执行的 lint 检测配置
"lint-staged": {
    "*.{js,ts}": [
      "eslint --fix",
      "prettier --write"
    ],
    "*.{cjs,json}": [
      "prettier --write"
    ],
    "*.{vue,html}": [
      "eslint --fix",
      "prettier --write",
      "stylelint --fix"
    ],
    "*.{scss,css}": [
      "stylelint --fix",
      "prettier --write"
    ],
    "*.md": [
      "prettier --write"
    ]
  }
package.json 的 scripts 添加 lint-staged 指令
"lint:lint-staged": "lint-staged"
修改提交前钩子命令
根目录 .husky 目录下 pre-commit 文件中的 npm test 修改为npm run lint:lint-staged
这样在git add . git commit -m "" 后就会对暂存区的文件进行检测
Commitlint
Commitlint 检查您的提交消息是否符合 Conventional commit format
- 安装
npm install -D @commitlint/cli @commitlint/config-conventional创建并配置commitlint.config.cjs
module.exports = {
  // 继承的规则
  extends: ["@commitlint/config-conventional"],
  // @see: https://commitlint.js.org/#/reference-rules
  rules: {
    "subject-case": [0], // subject大小写不做校验

    // 类型枚举,git提交type必须是以下类型
    "type-enum": [
      2,
      "always",
      [
    'feat', // 新增功能
        'fix', // 修复缺陷
        'docs', // 文档变更
        'style', // 代码格式(不影响功能,例如空格、分号等格式修正)
        'refactor', // 代码重构(不包括 bug 修复、功能新增)
        'perf', // 性能优化
        'test', // 添加疏漏测试或已有测试改动
        'build', // 构建流程、外部依赖变更(如升级 npm 包、修改 webpack 配置等)
        'ci', // 修改 CI 配置、脚本
        'revert', // 回滚 commit
        'chore', // 对构建过程或辅助工具和库的更改(不影响源文件、测试用例)
      ],
    ],
  },
};
执行下面命令生成
commint-msg钩子用于 git 提交信息校验,命令来自:
npx husky add .husky/commit-msg "npx --no -- commitlint --edit $1"Commitizen&cz-git
- 安装
npm install -D commitizen cz-git
- cz-git 配置
修改
package.json指定使用的适配器"config": {"commitizen": {"path": "node_modules/cz-git"}}cz-git 与 commitlint 进行联动给予校验信息,所以可以编写于 commitlint 配置文件之中
prompt: { messages: { type: "选择你要提交的类型 :", scope: "选择一个提交范围(可选):", customScope: "请输入自定义的提交范围 :", subject: "填写简短精炼的变更描述 :\n", body: '填写更加详细的变更描述(可选)。使用 "|" 换行 :\n', breaking: '列举非兼容性重大的变更(可选)。使用 "|" 换行 :\n', footerPrefixesSelect: "选择关联issue前缀(可选):", customFooterPrefix: "输入自定义issue前缀 :", footer: "列举关联issue (可选) 例如: #31, #I3244 :\n", generatingByAI: "正在通过 AI 生成你的提交简短描述...", generatedSelectByAI: "选择一个 AI 生成的简短描述:", confirmCommit: "是否提交或修改commit ?", }, types: [ { value: "feat", name: "特性: ✨ 新增功能", emoji: ":sparkles:" }, { value: "fix", name: "修复: 🐛 修复缺陷", emoji: ":bug:" }, { value: "docs", name: "文档: 📝 文档变更", emoji: ":memo:" }, { value: "style", name: "格式: 💄 代码格式(不影响功能,例如空格、分号等格式修正)", emoji: ":lipstick:" }, { value: "refactor", name: "重构: ♻️ 代码重构(不包括 bug 修复、功能新增)", emoji: ":recycle:" }, { value: "perf", name: "性能: ⚡️ 性能优化", emoji: ":zap:" }, { value: "test", name: "测试: ✅ 添加疏漏测试或已有测试改动", emoji: ":white_check_mark:" }, { value: "build", name: "构建: 📦️ 构建流程、外部依赖变更(如升级 npm 包、修改 vite 配置等)", emoji: ":package:", }, { value: "ci", name: "集成: 🎡 修改 CI 配置、脚本", emoji: ":ferris_wheel:" }, { value: "revert", name: "回退: ⏪️ 回滚 commit", emoji: ":rewind:" }, { value: "chore", name: "其他: 🔨 对构建过程或辅助工具和库的更改(不影响源文件、测试用例)", emoji: ":hammer:", }, ], useEmoji: true, emojiAlign: "center", useAI: false, aiNumber: 1, themeColorCode: "", scopes: [], allowCustomScopes: true, allowEmptyScopes: true, customScopesAlign: "bottom", customScopesAlias: "custom", emptyScopesAlias: "empty", upperCaseSubject: false, markBreakingChangeMode: false, allowBreakingChanges: ["feat", "fix"], breaklineNumber: 100, breaklineChar: "|", skipQuestions: [], issuePrefixes: [{ value: "closed", name: "closed: ISSUES has been processed" }], customIssuePrefixAlign: "top", emptyIssuePrefixAlias: "skip", customIssuePrefixAlias: "custom", allowCustomIssuePrefix: true, allowEmptyIssuePrefix: true, confirmColorize: true, maxHeaderLength: Infinity, maxSubjectLength: Infinity, minSubjectLength: 0, scopeOverrides: undefined, defaultBody: "", defaultIssues: "", defaultScope: "", defaultSubject: "", },- 添加提交指令
- 安装
package.json 添加 commit 指令
"commit": "git-cz"
- 运行时命令 然后就会在控制台上出现交互的信息,选择地配置你的commit记录
npm`` run commit